Cozy Newsletter
Marc Zeitlin has all of the Cozy Newsletters available at cozybuilders.org. Here’s some of the more relevant information to the Coz-E build.
Note for builders of gas-powered Cozys: I have not included any of the tips related to the fuel and engine systems. This will be a fully-electric airplane, and so I have no reason to include those for my reference.
Builder Tips
In addition to some of the dedicated articles going in more depth on specific advice, here’s a sorted list of most of the advice given in the Cozy Newsletter.
General
- Keep joints tight with “no joggles” to improve performance. (Cozy Newsletter #4)
- Do not cut up the large-size drawings. Instead, trace templates onto another sheet of paper and save the original drawings intact. (Cozy Newsletter #12) (Personally, I take photos of the drawings with a ruler for scale, but that’s for archival purposes).
- “NEVER allow yourself to be distracted while working on your airplane, such that you might not complete a task, and then forget to finish it later. We all have had the experience of visitors dropping in while we are working. Even if you have to be rude, finish the job before laying down your tools.” (Cozy Newsletter #24, The Canard Pusher #57)
- Joints between all permanently installed parts should be taped. (Cozy Newsletter #24)
- This one comes up in more than a few newsletters: Check your attach bolts. If more than 2 threads extend through the nut, add another washer. Don’t let the threads bottom out before the bolts are tight. (Cozy Newsletter #34)
- Holes through bulkheads or instrument panel do not need to be glassed. (Cozy Newsletter #36)
- Wherever possible, orient bolts either heads up or heads forward. (Cozy Newsletter #38)
- “Extruded piano hinges MS20001-P6, P5, P4, etc. are all identical except for the width of the flange. It is easier just to order and stock the P6, and if the flange is wider than necessary, trim it on your band saw.”“ (Cozy Newsletter #39)
- Try using a light inside to identify holes that have been glassed over. (Eric Westland, Cozy Newsletter #39)
- For bending aluminum, rule of thumb is that the bend radius should be no less than the thickness of the material. E.G. 1/16 inch thick aluminum can bend 90°, provided the radius is 1/16 inch or greater. Always bend aluminum across the grain, not with it. (Ray Goldsmith, Cozy Newsletter #39)
- Always order a little extra material, especially in the beginning, so that you don’t run out of epoxy, cloth, micro, or flox before finishing a job. (Cozy Newsletter #69)
- “all aluminum parts [should] be protected from corrosion by cleaning first with Alumiprep 33 or metal prep #79, and then soaking in Alodine 1201, which is a visible (golden brown) moisture barrier, greatly increasing resistance to corrosion. This also acts as an excellent surface to bond epoxy or paint. Even if you do not live near the coast, the airplane you are building could some day end up there.” (Cozy Newsletter #81)
Safety
- Use nitrile gloves for your hand, with water-soluble barrier cream on the arms. Switch out the barrier cream early and often. (Cozy Newsletter #89)
- This has evolved significantly, from the original advice, starting way back in #7: To protect your skin from epoxy, Nat heavily recommends water-soluble barrier creams. If you must use gloves, use nitrile gloves. Under no circumstances, use latex gloves.
Tools & Shop
- Store and dispense glass cloth on a rack in a wall cabinet. Hinge the front of the cabinet so that it opens to form a table to lay out the cloth for cutting. Keep a clean pair of scissors there just for cutting clean cloth. (Cozy Newsletter #14)
- Put a 2 inch overhang all around your work table. This makes clamping parts to the table much easier. (Cozy Newsletter #17)
Neil Clayton says the tool (s) he uses the most are sanding sticks he made himself. He says Home Depot paint dept gives away 2 sizes of paint stirrers; a 1“wide stick and a 2” wide version. Both have a nicely formed handle. I always grab a handful as I pass towards the check out. Then at Lowe’s I pick up some 12” x 18” sanding sheets (the kind used on those big floor sanders). Several grades are available. I use left over epoxy to glue the stirrers to the sheets and then split them into individual sanding tools with a razor blade when the epoxy has dried. One sheet yields about 10-15 sanding sticks of various sizes so they are cheap and disposable. Try it!
(Cozy Newsletter #78)
- Get a Fein tool for trimming cured layups and electric scissors for cutting cloth and peel ply (and trimming wet layups) (Cozy Newsletter #82)
Antennae
- Make sure the nav antenna misses the area in the bottom of the fuselage that will be cut out later for the nosewheel well. (Eric Westland, Cozy Newsletter #39)
Location
From Cozy Newsletter #34, with a discussion on where to place the antennas (For a Cozy 3).
- Transponder: In the nose ahead of the rudder pedals with the probe extending through a 1/4“ hole in the bottom of the fuselage.
- Nav: Two good locations:
- Underneath the skin on the bottom of the canard, legs extending forward and offset to the radio side.
- Under the skin on the bottom of the fuselage, legs extending forward on either side of wheel well.
- ADF: Use King electronic antenna and locate inside cockpit under right front seat.
- Com: Located under skin of winglets, per plans.
- FM and/or Marker Beacon: Under skin mid-wing.
GPS was not specifically called out, presumably because it wasn’t available back then.
- Be careful in laying out VOR antennas on the bottom of the fuselage to avoid future cut outs for the landing light and nose wheel. (Thomas Kennedy, Cozy Newsletter #55)
Here are the dimensions (each arm) Jim Weir has published for the following di-pole antennas:
- Marker Beacon - 34.3 in.
- FM Music Radio - 26.2 in.
- VOR/LOC - 22.8 in.
- VHF/COM - 20.3 in.
- Amateur 2m - 17.7 in.
- Glideslope - 7.5 in.
The COM is the only one that needs to be vertically oriented. All the rest should be horizontal. The VOR should be a V shape. Some say the marker beacon should be along the airplane centerline. I installed mine in the wing and it worked just fine. You should keep the tips of di-pole antennas away from metal, and away from each other, particularly transmitting antennas. I have used Jim’s measurements and they work well-better than most factory antennas. My GPS antenna is mounted in the nose, just under the inspection cover (pointed upward toward the satellites) and works well there. I like this location because the co-ax is very short. My transponder antenna is in the bottom of the nose, with the probe just sticking through the skin (pointed down toward the ground stations). You can make your own transponder antenna. It should be 2.65 inches long from the tip of the probe to the ground plane, and insulated from the ground plane. The ground plane can be made from .062 aluminum. It is about 8 inches in diameter (I lost my drawing). I have made my own from one of Jim’s kits, and also from scratch, and they work well. You attach the center conductor to the radiating rod, and the co-ax ground to the ground plane. You get a lot of satisfaction when you make your own antennas, they are all hidden, and they work better than the ones that cost mucho bucks!
(Cozy Newsletter #73)
Canard
Several Mark IV builders have advised us that their canards are slightly longer in cross section (chord) then shown on M-11, and when the lift tabs are in contact with the forward face of F-22, the trailing edge of the canard is 1/8 to 1/4“ aft of the forward face of F-28, and that the alignment tabs cannot be built as shown. Should this also be the case with your canard, you may lay up additional plies of BID locally on the forward face of F-22 up to 1/8“ thick, or remove up to 1/8“ of the trailing edge of the canard locally at the tabs, or a combination of both.
(Cozy Newsletter #44)
Canard installation. Make sure you allow for at least 3/4“ of horizontal travel for the canard so the incidence pins will not bind during installation or removal.
(Cozy Newsletter #50)
Some builders are still having trouble with the trailing edge of their canard being too low, such that the airfoil dips down and they have to mount the elevators lower than desired to get the required 15 degrees of trailing edge up travel. We suggest that you remove 1/16th inch (no more) from underneath the fishtail on the templates before cutting the foam cores, or from the foam after cutting to avoid this problem. We have made this suggestion to Feather Lite as well to do on their precut cores.
(Cozy Newsletter #53)
Canopy
On getting a smooth edge where the fiberglass contacts the canopy:
Builder Wayne Hicks said he made a paper pattern of the canopy deck, then laid up the 2 UND on plastic (and later the 2 BID), used the pattern and razor pizza cutter to make a nice, clean cut along the pattern lines. Then he laid the piece nice and neat up against the glass. There were absolutely no problems. No excess flox, no excess resin, no excess glass. Never had to use a dremel! If anything, all he had to do was cut one or two stray strands with a razor blade. He did this for both the outside and inside canopy deck layups, and highly recommends this technique.
(Wayne Hicks, Cozy Newsletter #70)
to avoid corrosion of the canopy hinge attach bolts. Saturate the bare wood in the holes through the longeron with epoxy to seal the wood fibers. Do this by dipping a cotton swab into epoxy and then inserting it into the hole. Alternatively, you can drill the hole slightly oversize, fill it with flox, and after cure, redrill it to the correct size.
(Nick Parkyn, Cozy Newsletter #83)
Contouring
- Fill low spots before sanding surrounding areas down to contour. This keeps your low spots from turning into high spots. (Cozy Newsletter #22)
I found a method to make the final canard contour perfect per plans. I used the checking contour templates for the canard to cut out (hot wire) a block of styrofoam. Then I stuck a large piece of sandpaper to it and used it to give the canard a perfect contour over its entire length. The same thing worked fine for the elevators.
(Jean-Jacques Claus, Cozy Newsletter #85)
Cowlings
Cowlings should have extra layers of BID along all the edges to make them more rigid when they are removed from the airplane, and to provide more beef for the fasteners. This is shown in Figures 12 & 15, Chapter 23, but builders were not instructed to add them because the supplier (Featherlite) added them while the cowlings were still in the mold. In February 1999, when we inspected AeroCad cowlings, we noticed that they were not doing this. We asked them to add the extra layers while the cowlings were still in the mold. They agreed, and we approved their cowlings contingent upon their doing this.
(Cozy Newsletter #68)
Elevators
Your elevators should balance with the weights shown in the plans. If they do not, do not try to balance them by adding weight inboard. Instead, discard them and make new ones more carefully to make them lighter (you can probably re-use the torque tubes and other hardware). The mass balance called out for the elevator and the specification for balancing them applies only to an elevator fabricated with the same weight and stiffness as that which has successfully passed all the flutter testing. It is extremely important, and life-critical that the manufacturer or owner of each Cozy, or any plane for that matter, assure himself without a doubt, that the control surfaces are conformal to those which have passed flight tests and been shown to be flutter-free.
(Cozy Newsletter #24)
Elevator torque tube offsets (CZNC-12A for the Roncz canard). The drawing we submitted to Brock Mfg. stated that these offsets should be a slip-fit in the l“ OD x .035“ 2024 T3 torque tube. Brock Mfg. cannot guarantee a slip-fit because the tolerance on wall thickness for .035“ 2024 T3 drawn tubing is +/-10 %. To prevent too loose a fit if the wall thickness is on the thin side, the specification for the offsets has been tightened to .930’ OD. If the wall is on the thick side, you will have to sand the offsets to obtain it slip-fit.
(Cozy Newsletter #50)
In the first edition Mark IV plans Chapter 11, p.7, we instructed builders to mount their elevators at zero degrees with jig L so that there was a .2 inch gap between the canard and the elevator. When some builders did this, they were not able to get 15 degrees trailing edge up of the elevators. So we changed the L jig (see p. M-18) to mount the elevators at 15 degrees trailing edge up and zero gap. Please note this on p. 7, Chapter 11, 1st paragraph and Figs. 17 & 18.
(Cozy Newsletter #68)
Epoxy
Starting with Cozy Newsletter #61, the MGS system is now recommended. Either the L335 or L285 system.
- Save the foam scraps. Many parts can be made by gluing small pieces together with 5-minute epoxy. (Cozy Newsletter #5)
- To conserve epoxy, mix microballoons with any excess into a very thick paste, and trowel that over your finished fiberglass parts. This will save you time when finishing. Rough the surface with 36 grit sandpaper first, though. (Cozy Newsletter #5)
- Lava soap works great to remove epoxy from your hands. (Cozy Newsletter #35)
- Use the bottom of 8 ounce mixing cups to make 5 minute epoxy (Cozy Newsletter #17)
- Store near-empty bottles of 5 minute epoxy on their side. (Cozy Newsletter #28)
- Mixing some flox with 5 minute epoxy will make a bit stronger joint and prevent it from running. (Cozy Newsletter #35)
- Epoxy Resin should be clear and colorless (or a slight yellow). Hazy indicates crystallization, and the epoxy should not be used until it is heated and becomes clear again. (Cozy Newsletter #85)
Cozy builder Phillip Johnson, in the Pacific Northwest, protects his resin and hardener from exposure to air by putting a plastic bag over the top of his plastic containers in his dispenser after filling them, with the bag resting on top of the liquid surface and with enough slack so the bag will follow the surface down as material is used, and then putting the cover on the container.
Cozy Newsletter #54
Fiberglassing
- Micro joints (which hold urethane blocks together) cause bumps when glass is laid over them. Undercut all joints with a dremel before shaping and before layup. Fill the undercuts with fresh micro just before the layup. (Cozy Newsletter #5)
- To prevent air bubbles from coming back in after being worked out, cover the cure area with saran wrap (or any plastic wrap) and squeegee the air out. (Cozy Newsletter #5)
- Cut the glass cloth ahead of the layup to the approximate size. Do this after the foam is vacuumed, but before applying any epoxy. Drape the cloth over the part, cut it to size, label it with a felt-tipped pen, roll it up and set it aside. (Cozy Newsletter #14)
- To prevent UNI from unraveling when cutting it lengthwise, lay down a strip of masking tape and cut down the tape’s center. Scissor trim the masking tape off after the cloth has been wet in place. (Cozy Newsletter #14)
- Use a sabre saw, not a band saw, to cut fiberglass. (Cozy Newsletter #17)
- Use a rubber squeegee to spread epoxy on the glass. Take a 6 inch squeegee, and cut it in 2. Remove the epoxy after use. You can use a belt sander to remove any cured epoxy, but it’s less work to just clean it. (Cozy Newsletter #31)
- It takes a couple of minutes for epoxy to soak in and wet out one or two layers of glass cloth. Rather than waiting for this to happen in a small area, use this time to spread epoxy over as wide an area as possible. Pour a ribbon of epoxy on the cloth and follow behind with the squeegee spreading it. Keep the pressure very light, so as to not disturb the cloth. After the cloth is wet out, you can increase the pressure of the squeegee to distribute it. You can pick up excess epoxy with your squeegee, wiping it off on the edge of your mixing cup. Conversely, you can apply a small amount of epoxy by dipping your squeegee into the mixing cup. If you practice these techniques, you will find that you can make lay ups much more quickly.
- Do not waste time trying to get just the right amount of epoxy on the lower layers of a multi-ply layup. Actually, cloth wets out better from underneath and not as much air is trapped between layers. It is only on the last layer that you need to spend the time working on getting the air out an applying the optimum amount of epoxy.
- Do not leave bristles from the throw-away brushes behind in your layups–they weaken it. You can pick them up with the tip of a brush.
- Double check that you remove the peel ply. If you leave it in and glass over it, the part must be discarded and rebuilt. (Cozy Newsletter #37)
- Instead of peel ply tape, get the 38 inch wide peel ply. Then, when you need tape, cut the peel ply to whatever width you need. (Eric Westland, Cozy Newsletter #39)
- “Buy cheap 100% polyester (or Nylon) cloth (peel ply) by the bolt and cover all layups with it. First test a sample piece to make sure no additives are present that may cause removal to be difficult. I find that I do not need to add extra resin to wet out the polyester, just stipple and use a hair dryer. I make it a habit to strip the polyester the next day, so none is left by mistake. This eliminates the need for a lot of sanding, and dust breathing. All layups look and feel smoother.” (Steve Blank, Cozy Newsletter #46)
- “We use peel ply extensively on all of our layups. Glass fibers act somewhat like a sponge, and can soak up extra resin. If a layup is resin-rich, it is not only too heavy, but it is weaker than a layup with just the right amount of resin. The peel ply seems to hold the fibers down more compactly, so they don’t soak up too much resin. Sort of a poor man’s vacuum bagging. If you use peel ply, you can make the layup a little wet, then lay down the peel ply, and with a squeegee and hair dryer, remove the excess epoxy (if the layup was really wet) or else free up almost enough epoxy to wet out the peel ply, and add epoxy as necessary to wet it out completely. The only thing you need to be careful of is that the layup underneath the peel ply isn’t so dry that it is porous, because then the compressive strength would suffer (buckling in compression). Synthetic fabrics with a straight weave (not knit), like nylon, polyester, or dacron, as long as they aren’t fuzzy, and don’t contain cotton or rayon, seem to work well. Sometimes you can find real bargains at fabric stores. But test a swatch first. Alexander Aeroplane lists peel ply at $2.25/yd. in 45” widths, which is quite reasonable.“ (Cozy Newsletter #47)
- “BID is always cut on the bias and overlapped l’ in every direction, but UND is overlapped only in the direction of the major fibers.” (Cozy Newsletter #50)
- Whenever possible, use peel ply. As an extra precaution, sand the surface that the peel ply was on before applying the bond. (Cozy Newsletter #55)
- A wet-on-wet layup usually results in the strongest bond between layers. To do this, wet out the first layer of glass, squeegee the air out, but leave an excess of epoxy and then lay down the next layer of cloth on top to soak up the excess. (Cozy Newsletter #55)
- Do not glass over a cured, microed surface, if structural strength is required. (Cozy Newsletter #55)
- Put flox in a bag and dispense it like cake frosting. (Dave West, Cozy Newsletter #62)
- In tight corners where it’s hard to roughen up the surface with conventional sandpaper, try a carbide studded grout removal tool that has carbide deposited on the edge of a steel blade approx. 1“ long attached to a handle with a slight “S” bent arm. (John Fritz, Cozy Newsletter #66)
Early in the game we learned that various fabrics sold in fabric stores work well as peel ply, and can sometimes be purchased at quite a low price. We learned that hard-weave (not fuzzy or stretch weaves) nylon, polyester and dacron work well. Watch out for cotton and rayon. Often there are roll ends tables where things are reduced for clearance. Once I was able to purchase nylon like is used in ski jackets for $.45/yd, and later wished I had bought the entire table. It is best to take a sample home first, use it on a wet layup, and make sure it peels off, before buying a whole bunch. Make sure you iron any wrinkles out of peel ply before using it. Otherwise they transfer to the layup.
(Cozy Newsletter #68)
-
A general rule is that whenever joining two or more intersecting surfaces together, they should always be floxed and taped, whether instructed to do so or not. (Cozy Newsletter #71)
-
- A rule of thumb for estimating how much mixed epoxy you will need for any given layup is 1 oz of epoxy for every oz of cloth needed. This includes the micro layer. “For example, the bottom side of one Cozy MKIV wing will need 12 yards UNI (7 oz/yd. 38” width) or 84 oz. total. Epoxy weighs 9 lbs. (144 oz) per mixed gallon, so you will need 84 oz. mixed epoxy to wet out 12 yards of UNI.” (Cozy Newsletter #80)
-
Leave a little mixture of epoxy in the cup and check it for cure the following day. If it has cured correctly, a scratch on the surface will leave a white mark (Cozy Newsletter #81)
-
“[If] glass cloth wets out and becomes transparent, it is safe to use. If it stays white, throw it away.” (Gary Hunter, Cozy Newsletter #83)
-
“DO NOT USE glass that has become wet.” (Gary Hunter, Cozy Newsletter #83)
-
Take your time. Do not apply epoxy until you are 100% satisfied with the shape and integrity of the part. (Neal Johnson, Cozy Newsletter #84)
Tom McNeilly’s Vacuum-bagging technique
From the Cozy Newsletter #4, this describes a way to get very light layups using vacuum bagging. Later newsletters state that vacuum-bagging is generally not worth the effort, though.
Place the layup down as quickly as you can, cover it with perforated poly. Cover that with soft carpet underlayment foam, and cover that with regular poly. Tape down the edges, and pull a vacuum with a vacuum cleaner house between the layers. The vacuum should squeeze the excess epoxy out of the layup and into the soft foam. After cure, strip the coverings off, including epoxy. Tom claims this saved 6 lbs per wing.
Dealing with BID
- You can create 2 inch wide BID cloth tape by rolling the BID cloth into 1 inch diameter rolls at 45° to the selvage edge. (Cozy Newsletter #4)
- For installing BID into the corner tapes: Layup the BID you’ll need onto the foil. Squeegee it out to a good layup. Cut your tapes out of this layup, cutting through the glass and aluminum foil. Sand and paint a coat of epoxy onto the area to be laid up over, then use your fingers to bend the aluminum foil to form the tape into an angle to fit into the corner. Position it, then lightly squeegee or stipple it into place. Peel the aluminum foil off, stipple any remaining air bubbles out, peel ply the edges. (Cozy Newsletter #4)
- Sand a slight recess (1/32 inch) into the foam on flat or curved surfaces where you’ll place BID overlap joints so overlaps won’t cause a bump in the finished surface. (Cozy Newsletter #5)
Finishing
- Don’t use featherfill. It does not bond well with epoxy and will cause the paint job to delaminate in a year or two. (Cozy Newsletter #10)
- Make sure to fill and finish paint the inside of the cowlings. (Cozy Newsletter #22)
- Most silicones give off corrosive fumes, Dow Corning Silastic RTV 738 is a non-corrosive sealant, use it to secure the cover plates over the wing attach bolts. (Bruce Ibbotson, Cozy Newsletter #22)
- Use Polyurethanes, not Enamels or Lacquers. Enamels and lacquers chip in heavy rain. (Vance Atkinson, Cozy Newsletter #23)
- “It is not necessary to use a spray booth to paint an airplane and get a good finish. You can spray the finish coat in a garage or outside. After cure, wet sand with 1000 and then 1500 grit, and then buff with 3M Finess-it II. This will remove orange peel, overspray, dust, and other imperfections and result in a very flat surface with high sheen. This works well with Ditzler Deltron (acrylic urethane) which is the finish we recommend.” (Cozy Newsletter #41)
- “We recommend use of a high-build epoxy primer. Cozy builder Nick Parkyn in Western Australia says that he has used the new System Three water reducible Epoxy Primer and Polyurethane paints and is impressed with the performance. We are not familiar with these products and have asked him for more information. We would welcome other builders input.” (Cozy Newsletter #41)
- “Have you ever tried to pour paint from a full 1 gallon can and had it run down the side? Try this. Wrap a strip of masking tape (2- wide works the best) around the top of the can, and punch a hole in the groove around the rim. You should be able to pour without spilling, and the excess paint should drain through the hole back into the can. The hole will be sealed after the cover is reinstalled.” (Cozy Newsletter #41)
Mark IV builder Chuck Larson writes, “I’ve discovered a tip that works great for wet sanding the Sterling primer. I use a grouting trowel which is used for grouting ceramic tile. I bought mine years ago at Color Tile. It is 9” x 4“. It has a wooden handle attached to an aluminum plate which has dense rubber foam bonded to it. Wet or dry sandpaper will adhere to the foam rubber well enough to allow the sanding. It keeps the surface flat, and it is easy to remove and wash out the sandpaper“.
(Cozy Newsletter #44)
If you need to pour paint from a can without spilling and wasting a lot (paint is expensive!), first punch a hole in the trough around the rim to let paint drain back into the can. Then wrap some 2“ tape around the rim of the can, extending up above the rim about 1-1/2“. Now you can pour the paint out of the can without it running down the side of the can, and any excess will drain back into the can.
(Cozy Newsletter #45)
- If you use masking tape when painting, don’t leave it on a long time, and when you remove it, pull it back at 180° to itself, not 90°. (Cozy Newsletter #63)
I just completed painting the bottom of my plane. I’ve used the new poly fiber system. All water based. Very impressed. Pin holes are a total non-issue. Particularly when you use the Superfil instead of normal microballoons. Superfil is substantially better than micro. Trapped voids are rare. Sands easy, mixes easy. Areas where I used micro have more pinholes, but using the Smoothprime primer is highly effective at filling pinholes. It really does flow into holes. Must have low surface tension or something. I also elected to use their water based “topgloss” top coat (polyurethane). So far, I really like it, but I have yet to color sand and buff the paint, so the verdict is still out. I haven’t done adhesion tests yet. On my second coat (of three) of topgloss, I got too aggressive and had quite a few runs on corner radius. I elected to sand the entire coat before applying my last coat. Final coat looks good, although areas have a matte appearance (too lean). No runs. The top coat appearance is quite sensitive to spray quantity. More is better unless you develop runs. I had no problems with vertical surfaces. I learned that I don’t need to use finer than 120 grit when sanding micro or superfil. The primer fills all those scratches fully. I used a sanding stick only to achieve straightness, then I used an electric random orbit sander with 220 grit. I was willing to sand the primer completely off to achieve uniform appearance. I mixed paint and primers 1 cup at a time to avoid splatter. I’ve heard people describe sanding and painting as the worst part of the process, but I enjoy it. It’s great to see objects finally transformed into airplane like appearance. Just wanted you to know more about these new products. My superficial conclusions: Superfil micro replacement is way better. Smoothprime primer is way better. Topgloss top coat may not be better (lotta work)….we’ll see when I’m further along.
(Al Wick, Cozy Newsletter #67)
I put the drip lip on the front fuselage cover last night. Here is a hint for those who have yet to do this. The plans say to build up an 1/8 inch ledge with balsa or foam. I used a piece of 1“ wide webbing (either climbing rope type webbing or load binding strap type webbing) with duct tape on top of it. The webbing will bend around the curve just right, and it is about the right size.
(Norm Muzzy, Cozy Newsletter #72)
- Do not use polyurethane paint. Nat recommends a acrylic-urethane (PPG “Deltron” or “Concept”) (Cozy Newsletter #83)
Fuselage
- If you have difficulty stickling the copper foil tape to the bottom of the fuselage, try heating it with a hair dryer and pressing down on it with a hard rubber roller. (Eric Westland, Cozy Newsletter #39)
Fuselage Sides
- Put a 6“ wide strip of wax paper between the masonite and the foam pieces where the edges butt together. This will make the eventual removal from the jigs MUCH easier. (Thomas Kennedy, Cozy Newsletter #49)
- In assembling the bulkheads to the sides, forget the ropes to tighten the whole assembly. Use threaded rods and wing much more precise control. (Thomas Kennedy, Cozy Newsletter #49)
- Buy a kiln-dried board (not construction grade) for your WL 0.0, and use bolts rather than nails to secure. This will allow precise placement and later shimming if required. (Thomas Kennedy, Cozy Newsletter #49)
- I had very good results mounting my WL 0.0 board on my work table which was mounted to 4x4s glued to my garage floor. There is no such thing as a level garage floor. The work table becomes your level surface. (Thomas Kennedy, Cozy Newsletter #49)
Foam
- Before cutting wing sections, clamp the styrofoam blocks and glue them using pour foam. This produces very thin joints that keep the styrofoam joined together while still allowing the hot wire to cut them without catching. (Tom McNeilly, Cozy Newsletter #4)
- You can use a dremel tool with a router attachment to make the small depressions in foam as called out in the plans. (Cozy Newsletter #15)
- Covering the edges of hot wire templates with copper foil tape makes them easier to use (Cozy Newsletter #38)
- “The 2 lb./cu.ft. large cell blue styrofoam called for in the plans is called Styrofoam in the Aircraft Spruce catalog, Polystyrene in the Wicks catalog, and extruded Polystyrene in the Alexander catalog. Urethane foam may also be called Polyurethane foam.” (Cozy Newsletter #39)
- Use a router to carve 1/8 inch and 1/16 inch relief cuts in the foam (e.g. in chapter 9, on the landing brake). Attach the router base to a 36 inch long board to make quick, smooth work of the cuts. (Eric Westland, Cozy Newsletter #39)
- Try using double-sided tape on the forms to hold the foam down. Recommended the kind used on golf club grips or carpet tape. Should peel right off with little or no effect on the foam. (Mark Loy, Cozy Newsletter #64)
If you “screw-up” when cutting airfoils, and have a bad cut on one side (top or bottom), no need to throw it away and start over. Just slice the airfoil apart, and splice in a piece of styrofoam (like making a sandwich), and re-cut it. Don’t know how to make a sheet of styrofoam? Just clamp your hotwire saw 1⁄2 inch or so above your work bench, and slide your scrap chunks of styrofoam underneath, sorta like cutting boards from logs. The beauty of composite construction is its hard to spoil something so bad you can’t fix it.
(Cozy Newsletter #77)
Joints
For Structural reasons, all joints should be taped with 2 plies of BID 2’ wide (1“ on each surface) cut on the bias (45 degrees) unless otherwise specified. After application, the tape should be peel-plied. One recommended way to accomplish this is to wet out 2 plies of BID on wax paper or Saran wrap, cut into strips, apply over joints, remove the wax paper or Saran wrap, cover with peel ply and wet out same. Wax paper should only be used with discretion. It should not be left in place while the epoxy cures, because wax will be left behind, and it should only be used on those joints which will not be later covered with additional layups.
(Cozy Newsletter #50)
Landing Gear
- “If you wrap the gear leg first with 1/8” fiberfrax, and then with shiny aluminum, you will greatly reduce the heating by radiation.“ (Cozy Newsletter #24)
- “Provide a vent for hot air to escape from your wheel pants. Hot air rises and will be trapped inside the wheel pants unless you provide a vent, on the top, on the disc side, for it to escape.” (Cozy Newsletter #24)
In Chapter 9, p.2, it says that the [landing gear] strut should be cut at 8 degrees, but on p.3 it says 13 degrees. There has been some disagreement as to what is the correct angle, and it also depends on whether it is measured at the leading edge or trailing edge. The angle is not critical, so shoot for somewhere in between.
(Cozy Newsletter #68)
I thought it was in the plans, but maybe not. An easy way to make the fairing where the main gear strut enters the fuselage is to shape it with molding clay (Playdough), glass over with at least 2 layers of BID, attaching to both the strut and the fuselage. Then after cure, make a saw cut at least 1/8“ wide halfway between the fuselage and strut, remove the strut, and dig out the clay. If the cut is wide enough and the inside of the fairing is empty, the strut can flex without cracking the fairing. This should be done when the fuselage is upside down with no weight on the gear. Then when you are flying, both halves of the fairing will be aligned for minimum drag.
(Cozy Newsletter #72)
Panel
- Don’t cut holes for your panel until everything else is done, and you’ve put together the instrumentation. Build a mock panel first (Nat suggested 1/4 inch plywood. You can also use cardboard) to test it out. (Cozy Newsletter #5)
Spars
The 3 inch spar cap material presently being supplied is only 2-3/4 inches wide, but not to worry. If you pull out the cross threads as instructed for the canard, centerspar, and wings, and then squeegee after applying epoxy, the strands spread out to 3 inches, and you will be able to fill up the troughs with the maximum amount of glass they can hold.
(Cozy Newsletter #65)
Strakes
Bending 3/8 in. PVC is a universal problem. When I re-built my right strake, I made a scribing tool from a block of wood and a hacksaw blade. I made a saw cut in the wood and 5-minuted in the hacksaw blade so it protruded 1/4 in. I carefully scribed a number of cuts in the PVC where I wanted it to bend, then bent it into the frame and fastened it in the bent shape, and then microed and glassed the scribed surface. That worked better than anything else I have tried to date.
(Cozy Newsletter #10)
- Postpone installing the center section spar and building the strakes until you have completed as much work inside the fuselage as possible. It is much easier to work inside the fuselage with it sitting on its side on saw horses. (Cozy Newsletter #35)
It is important for appearance that the strakes are straight (no bumps), and properly aligned with the wing. The wing should be installed on the center section spar when the strake is built, and a straight edge should be used to make sure that the leading edges of the ribs are aligned with the leading edge of the wing, and that all points on the rib airfoils align with the wing airfoil. Of course, you will need to make allowance (using spacers) for the 3/8“ foam and several layers of glass skin which will be subsequently be laid over the ribs.
(Cozy Newsletter #44)
Strakes, Chapter 21, p.2. Please note that the fuel cell ends at Rib R-57. The empty space outboard is necessary as a buffer to prevent any fuel, liquid or vapors, from reaching the wing. An open drain at the low point would indicate any fuel leakage through R-57.
(Cozy Newsletter #64)
Keith Scull (England) didn’t want to pay the cost of shipping Featherlite’s leading edges all the way from California, and he didn’t like the idea of carving foam blocks, so he came up with an innovative alternative. He purchased some thin card stock from a local art supply store, wrapped it around the leading edge of the strake using the ribs as guides, trimmed it so it just fit into the recess provided for the leading edge layup, and taped it in place with 20 inch long strips of masking tape. Then he cut openings in the top so he could pour pour-foam into the empty space. The openings were 3 in. x 1/2 in. every 6 to 9 inches parallel to the strake leading edge. He poured the pour foam thru the slots, let it expand and cure, and then removed the masking tape and card stock. He said the result was a perfectly formed leading edge which required very little sanding to prepare if for the glass layup (see pictures). He said it sounds like a lot of work, but only took a couple of hours, and did a better job with less mess.
Keith said when he leak tested his strakes using an altimeter, the right strake had a very small leak (20 ft. in 3 hrs.). He couldn’t find it with soapy water. So he called in a local refrigeration man who filled the strake with R22 and used an electronic sniffer to locate the escaping gas. He found the leak. It was traveling along the score lines he had cut in the foam to bend it around the ribs, and escaping where the foam joined the fuselage. Apparently he hadn’t completely filled up these score lines with micro. The cure was quite simple. He drilled a very small hole thru the top skin into the score line at the tank rib and injected epoxy using the vacuum method described in the plans. To be doubly sure, he did this with every one of the score marks, and found three to be leaking. After filling with epoxy, the altimeter indicated no more leaks.
(Cozy Newsletter #68)
Wings
There is a discontinuity (dip) in the top surface of the wing at B.L. 67.5 (see Chap. 19, p. 10). This is intentional. You have not made a mistake!
(Cozy Newsletter #53)
when you attach the wings many times in the shop, don’t use the AN365 nuts over and over again, but instead get some fine thread nuts at the hardware store which are much easier to install and you don’t have to worry about them wearing out.
(John Epplin, Cozy Newsletter #73)
Unsorted
Jim White’s advice
From Cozy Newsletter #67, copied verbatim:
- Attach the wing before working on the stake and bondo a 1/4“ or so thick template to the end of the main spar that matches the contour of the wing. This is needed so that the strake matches up to the leading edge.
- When cutting out the top and bottom PVC foam pieces, finish one (top or bottom). The top is the same as the bottom except it is 0.2“ longer. All the angles are the same. Use the top or bottom strake as a template by simply shifting it up or down 0.2“ accordingly. You might as well make all four top and bottom skins at once. GET THE FIRST ON RIGHT, OR YOU WILL HAVE 4 WRONG ONES.
- I placed blocks under the ends of the landing gear struts to level the airplane perfectly and give it a solid foundation. I supported the jig table with two saw horses, and four pieces of 2x4’s individually clamped to the saw horses. The jig table simply rests on the ends of the 2x4’s that are adjusted up or down.
- INSTALL THE RELEASE TAPE ON THE BACK OF THE JIG TABLE BEFORE ATTACHING IT TO THE MAIN SPAR.
- Use long clamps from the top of the spar to the jig table beneath to firmly attach the plane to the jig table, inboard and outboard on the spar. I did not use any bondo and the jig table never moved relative to the plane, even when getting in and out of it repeatedly to cut out the openings and tape the inside joints.
- I believe the strainer inspection hole in B33 is marked wrong in the plans. The inspection hole should start 6“ from the spar, not 3“.
- For B33 bulkhead reference I clamped a straight edge to the canard bulkhead and strung a string back to a mark on the top of the spar. For the B57 bulkhead I simply used a plumb bob hung over the edge of the jig table at BL 57 and attached the other end to a mark at 57“ from centerline on the spar.
- The B.L. dimensions are to the INBOARD face of the bulkhead. Carve the outboard to get the contours of the bulkheads to match the sweep of the strake. DO NOT CARVE THE INSIDE EDGES.
- String a line from the leading edge of the template you made in step 1 above to the fuselage using the leading edge of the bulkheads as a guide. This will ensure the leading edges of the wing and strake come together.
- 1 inch spacing is fine for the scoring of the bottom foam to bend around the ribs.
- On the top foam, 1/2 inch cuts minimize the flat spots which occur on the top of the curved part of the strake between the two bulkheads. Make the cuts just after the 1 ply layup has cured. If you can make the cuts while the fiberglass is hard but still pliable, you can bend it over the ribs and let it finally cure in its final shape.
- I fully trimmed the strake openings into the fuselage before putting the top on permanently. If you jig the top foam sufficiently, it will match up repeatedly to the same place on the fuselage.
- I wanted to make sure my upper skin was firmly attached to the ribs so I made a flange to go on the bulkheads instead of simply stacking flox on the bulheads. The flox method probably works just fine, but I have heard of some Cozys developing fuel leaks after time and thought this might minimize the possibility of this occurring. This modification added several days work to the process! When the top foam is all ready to flox to the bulkheads, I carefully marked the location of the bulkheads on the bottom of the top strake skin. I then turned the top foam over. You only need to do this for the interior fuel tank edges. Do not extend the flanges into the storage area. You can tape those areas like normal. Do the leading edge, but not the trailing edge along the main spar. On top of each bulkhead marking I put a wide layer of box sealing tape, followed by a layer of peel ply, one layer of bid tape 2“ wide, and peel ply on the outer edges of the 2“ bid tape. On this second layer of peel ply, DO NOT PUT THE PEEL PLY WHERE THE BULKHEAD OR RIB WILL SIT. Err on the cautious side when putting on this peel ply. You can always sand the area not peel plied, but it is difficult to remove peel ply between the flange and bulkhead. Place a thin layer of flox on the bulkheads and place the top on to cure. Let it fully cure for at least a day or the one layer of bid will sag after you pull the top back off. Pop the top off and remove all the peel ply. Glass the interior corner of the new flange with one layer of bid tape, let cure, trim with dremel, and “voila”, flanges that perfectly match your strake skin.
- When you place the top skin to the bulkheads and ribs, realize that it is a ton of work to tape all the inside edges. But doing the top skin placement and inside tapes in one sitting will save lots of sanding while upside down in the back of your airplane.
Owners Manual
Updates from Newsletter #52
From Cozy Newsletter #52:
Do not fly until you add the following information to the Takeoff performance section of the Owners Manual, and comply:
High Density Altitude Takeoffs
The combination of high aircraft gross weight and high density altitude represent significant dangers for takeoff obstacle clearance. Special care is required to avoid premature rotation, i.e., if liftoff is too slow, the aircraft will be on the back side of the power curve and may not climb. When operating heavy and high (say, within 100 lbs. of gross weight and above 5,000’ density altitude) do not fully rotate to liftoff attitude until your airspeed is within 5 kts. of the best rate of climb speed, for your specific weight and altitude (see climb charts). This will require more runway than a slower liftoff, but will assure the best capability to clear obstacles and continue a safe climb. Never attempt takeoff under conditions in which you cannot achieve best rate of climb speed while still on the available runway. If this ability is not clear at any point during takeoff_abort. Off-load weight or wait for a cooler time of day. Lift-off is possible as slow as the minimum lift-off speed, and can be successfully used at light weights and/or low altitudes to achieve a short ground roll. However, that technique will usually result in inadequate initial climb if used when heavy or high. Runway slope effects are minor when light or at low altitudes, but they become very significant when heavy/high. For example, a 1% uphill runway slope may add well over 1,000 feet to the distance required to clear an obstacle. Never take off uphill when your takeoff toll performance is marginal. Never continue a takeoff if crosswinds require you to brake so much that a safe liftoff is in doubt. Always use best power mixture for high altitude takeoff conditions. An over-gross weight takeoff that seems like an acceptable operation near sea level can be a real killer when hot and high. Never attempt a takeoff when over approved gross weight!
There may be considerable variance in takeoff capabilities from one homebuilt aircraft to another of the same type. Engine installed power and propeller efficiency at low speeds may be less than that for the prototype that provided the basis for the takeoff distance charts. Find a long runway and measure your takeoff capability at the weights you intend to fly. If your actual performance is less than the charts, correct the charts or improve your prop and/or engine.
Updates from Newsletter #56
From Cozy Newsletter #56.
Page 46, ENVELOPE EXPANSION: Add this:
Caution:
Before expanding your flight envelope, you should make sure your airplane has positive pitch stability; i.e., if you trim it for level flight and then either pull back on the stick or push it forward, upon release of the stick, it should return to level flight in no more than 3 oscillations.
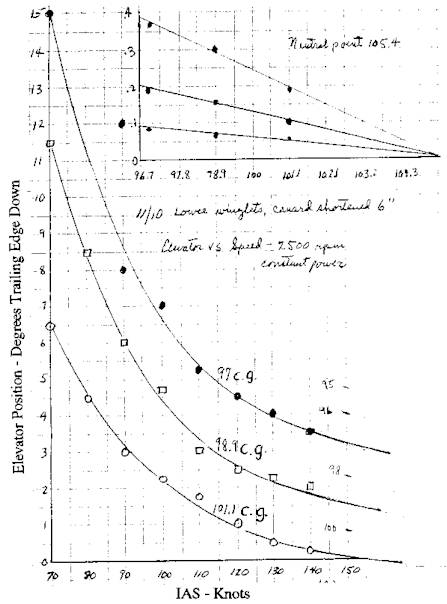
Also, before expanding your flight envelope, you should double check that your canard is set at the right angle of incidence and/or your c.g. calculations are correct by comparing elevator position with the flight test data for our plans model shown below. If your elevator position differs by more than 1 degree, land and re-check your canard incidence using template “G”, and re-check weight & balance and c.g. calculation. Do not fly until you have determined the problem and corrected it.
- Page 19, Stall Characteristics, 2nd para.: After “shortening the canard span 6”, add “to a resultant tip to tip span of 151”.
- Page 19, Stall Characteristics, 3rd para.: Instead of “plans”, substitute, “1st edition plans”. Page 19, Stall Characteristics, end of 3rd para.: Add, “This applies to builders with 1st edition plans. The canard span has already been reduced on 2nd edition plans to 151” tip to tip.
- Page 25, under recommended entry speed for Stalls, after “Slow deceleration” add “from level flight only”.
- Page 25: Delete “Accelerated Stalls” as an approved maneuver.
- Page 33, Canard incidence: Delete “templates B & C” (a holdover from the 3-place Owners Manual), and change to “template G”.
- Page 33, Canard incidence: Change tolerance from +_ .3 deg. to + .6 deg and - .0 deg.
Updates from Newsletter #64
- Page 35, Main landing gear: Check wheel camber. When aircraft is empty, wheel camber should be between 2.5 to 3.0 degrees negative (bottom of wheel tilted in). Measure after pushing aircraft forward at least 5’, then aft 5’ and take average. Record in aircraft log book.
- When checking for proper toe-in, wheel camber should increase slightly when pushing forward and decrease slightly when pushing aft.
- Page 50, Annual inspection: Check wheel camber and toe in as prescribed on page 35 and record in aircraft log book.
Updates from Newsletter #65
- Page 35, Main landing gear: Check wheel camber. When aircraft is empty, wheel camber should be between 2.5 to 3.0 degrees negative (bottom of wheel tilted in). Measure after pushing aircraft forward at least 5’, then aft 5’ and take average. Record in aircraft log book.
- When checking for proper toe-in, wheel camber should increase slightly when pushing forward and decrease slightly when pushing aft.
- Page 50, Annual inspection: Check wheel camber and toe in as prescribed on page 35 and record in aircraft log book.
Mark IV Part Weights
David Domeier (unfinished)
| Item | Weight (lbs) |
|---|---|
| Center Section Spar | 48 |
| Fuselage on gear (no canopy or strakes) | 242 |
| Canard & elevators | 33 |
| Right wing with winglet & aileron | 69 |
| Left wing with winglet & aileron | 68 |
| Turtle deck with glass | 12 |
| ———————— | –– |
| Total | 472 |
As of Cozy Newsletter #50, this wasn’t all of the weights.
Paul Kuntz (unfinished)
| Item | Weight (lbs) |
|---|---|
| F22 Bulkhead | 2.45 |
| F28 | 10.7 oz |
| Seat back | 5 lbs, 1.9 oz |
| Lower forward landing gear bulkhead | 1.4 |
| Upper forward landing gear bulkhead | 0.7875 |
| Aft landing gear bulkhead | 2.7 |
| Lower firewall | 1 lbs, 14.5 oz |
| Center firewall | 10.2 oz |
| Upper firewall | 3 lbs, 7.8 oz |
Flying advice
- When filing for IFR, use the designator CZ-10. (Cozy Newsletter #36).
- Keep a fire extinguisher in the plane.
- When filing flight plans, the correct designator for the Coze 3 and 4 place aircraft is HKB (Cozy Newsletter #43)
- As of Cozy Newsletter #51, use COZY as the designator when filing flight plans.
Flight Testing
- One of the tips in Cozy Newsletter #51 suggests AC-90-89A, Amateur-Built Aircraft and Ultralight Flight Testing Handbook. The current version is AC-90-89B
Last updated: 2023-09-22 22:19:28 -0700